Chapters:
2.1 The Aquarium:
Size:
The biggest one possible will give the stablest water conditions. Nothing against a small tank, but they actually can be more work and the temptation to overstock is higher. A larger stand/ cupboard will house all the technical stuff (and nonsense) you acquire over time.
Shape:
A rectangular 'off the shelf' size will be cheapest, though being sold for the freshwater market, sizes usually stop at 50cm height and depth .
A panorama type can look good,
but you have to keep 5 sides free of algae (including the calcareous
variety).
May look less like a big box.
A delta is ok for the corner-
but will the lighting fit over it. Restricted place for a sump filter!
Rounded front glass-
a curved inside surface is not as easy to clean. The latter two styles are also somewhat more difficult to decorate
Depth (i.e. front to back) is important. Seawater is denser and has a higher refractive index than freshwater. This makes a 40cm depth tank, which may be quite adequate for freshwater, look to have no depth at all! If you have room, 60cm is ok. Access to all points within the tank is important for cleaning purposes
White glass gives better colour. It's dearer because the silica used to manufacture this glass has to have the usual iron oxide impurities removed, these give normal glass its green tinge- just look at a thick piece of glass end on.
Perspex/ acrylglass- there are a few manufacturers but are very costly, I
suspect due to their exclusivity more than their actual manufacturing
cost.
More info at http://www.schuran.com, a well known manufacturer of such aquariums. Light weight and almost limitless form may be an advantage
Home made tanks of wood, PVC, cement, glassfibre or other materials
with a front
glass
panel- I have seen good ones. There are web sites with instructions.
Don't think it will save you money. Hard work and costly if you make
any
mistakes. Usually need a special 2- component (PVC?) waterproof coating on the non- glass
surfaces, which isn't practical to apply indoors unless you have a
large workshop with mechanical ventilation.
You should choose an
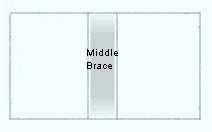
aquarium with adequate glass thickness. Whilst
glass that is too thin may not actually give way, it will certainly
bend, which is why many tanks, mainly those intended for freshwater
use, have a wide
middle brace. If you do have a middle brace, and want to use this tank,
plumbing for filtration should be your next
thought
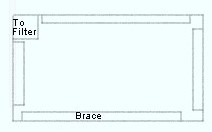
If you are
having the tank custom made, then strips of glass along the lengths of
the tank are good, but a middle brace may well be in the way of the
lighting for a reef system. 10mm glass is
then ok for an aquarium 100cm long, I would go for 12mm glass for 120
to 150cm length, then increasing above this. Your specialist dealer
will advise you.
"Off the shelf" complete marine setups are also ok, but you have to be satisfied with all the technical equipment which comes in the package.
Converting a freshwater system may seem tempting, but you will be faced with many compromises, and a tank which is probably a few years older than you remember. If you think you bought it 5 years ago, get out the receipt/ guarantee slip if you still have it- chances are it is more like 8. But this isn't a discussion of human nature......... You will also, if you want to put your filtration in a sump, need to drill the glass, this is not for the faint hearted- you cannot afford any mistake here.
2.2 Siting the Aquarium
Even a medium size aquarium using only 10mm
glass is quite heavy.
For example, a 100cm x 60cm x 60cm aquarium will weigh about 80Kg empty.
Add 300 litres (KG) of water, plus rockwork and you have something like 500Kg
which needs siting properly.
You will have probably thought of a stand (home made or not). The
stand's construction will influence how you site the aquarium. Most
commercial stands are effectively cupboards with coated mdf or
chipboard panels used in their construction. You might then find that
the underside in contact with the floor just consists of the outer
frame. This will apply all of the weight to small areas of the actual
floor. The stand must also be level- this means your floor should be
level. If it isn't, you will have to pack something under the stand to
fix this.
The wall directly behind the aquarium should be a load- bearing wall.
2.2.1 Wooden floors
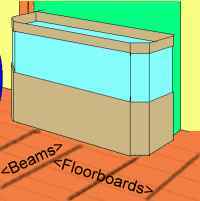 By this, I mean
wooden beams with wooden floorboards nailed down on
top. Whether the floorboards are bare, covered with carpet, or indeed
anything else, this will make no difference.
By this, I mean
wooden beams with wooden floorboards nailed down on
top. Whether the floorboards are bare, covered with carpet, or indeed
anything else, this will make no difference.
The tank's stand or cupboard should stand on a plinth to spread the
load. An adequate plinth can be made from marine grade plywood (this
won't start to swell or fall apart at the first water spillage). The
long axis of the aquarium should be sited so it lies parallel to the
flooring. This is so it is at 90° to the joists/ beams underneath. You
should see from the rows of nails going through the floorboards where
the beams are. Try and site your aquarium so it stands on at least two
beams, to spread the load. This means that if you want to put the
aquarium next to a wall, your choice is limited to 2 particular sides of a
rectangular room.
Has the floor been sanded- if it is waxed or varnished, it almost
certainly will have- it is in the nature of things that the sanding
treatment will not have taken as much wood off next to the walls. You
may therefore need to leave a larger gap than you intended between the
back of the aquarium and the wall behind it.
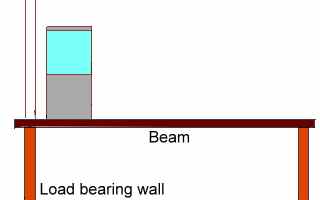 Beams are usually
suspended between 2 walls over a length of 3-4 metres. The walls that
these beams lie on are bearing the load. Load- bearing walls are
generally thicker than non- load- bearing ones, in modern housing, the
latter are often made of a wooden frame with plasterboard surface. One
of the load bearing walls is often also an outside wall.
Beams are usually
suspended between 2 walls over a length of 3-4 metres. The walls that
these beams lie on are bearing the load. Load- bearing walls are
generally thicker than non- load- bearing ones, in modern housing, the
latter are often made of a wooden frame with plasterboard surface. One
of the load bearing walls is often also an outside wall.
The further away from the support the aquarium is, the more it will
exert a load called the moment
tending to make the beam move- think of the support point as a pivot,
and the tank exerting a levering action- think of wheelbarrows and
seesaws.
2.2.2 Solid/ suspended floors
This includes parquet and laminate flooring on a concrete base, but not a floor skimmed over floorboards. Most stands/ cupboards will be able to be stood directly on these floors, but just as the sanded floor tends to go up at the edges, a concrete floor is not guaranteed to be flat and level. You can pack strips of wood or plastic under the stand (before you put the aquarium on it) using a spirit level to ensure it is absolutely level.
2.2.3 Unlevel Floors
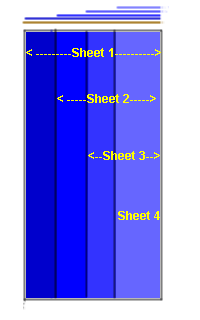 What you need is a
plinth. Can you buy a plinth? No! You need plywood-
waterproof grade. MDF will not be good for this, since it is adversely affected
by water. The plinth should be cut to 2cm more than the width and
length of your cupboard. You then can use an adhesive spray and cut
pieces of, for example the plastic foam sheeting normally used under parquet
flooring. If you cut the first piece to cover the plinth bottom, you
can then cut the next a few centimetres narrower and so on so as to
make the underside fit the contour of the floor and make the upper side
of your plinth level. You can also fix a single layer to the top. The
plastic sheet is robust, will give a little, and should give you a
satisfactorily level plinth on which to place your stand.
What you need is a
plinth. Can you buy a plinth? No! You need plywood-
waterproof grade. MDF will not be good for this, since it is adversely affected
by water. The plinth should be cut to 2cm more than the width and
length of your cupboard. You then can use an adhesive spray and cut
pieces of, for example the plastic foam sheeting normally used under parquet
flooring. If you cut the first piece to cover the plinth bottom, you
can then cut the next a few centimetres narrower and so on so as to
make the underside fit the contour of the floor and make the upper side
of your plinth level. You can also fix a single layer to the top. The
plastic sheet is robust, will give a little, and should give you a
satisfactorily level plinth on which to place your stand.
Although you will probably put a styropor sheet between the aquarium
base glass and the top surface of your stand, this surface should not
be used for levelling purposes.
If you measure direct from the skirting board and find the floor quite
unlevel, measure again starting 5 cm from the edge, this will probably
be much better, and in any case you probably need to leave a little space for cables, tubing etc.
behind the aquarium.
2.2.4 Wall mounting
A more complicated way of fixing an aquarium. Needs a strong, load bearing wall in good condition. 2 (or more) metal brackets need to be fixed to the wall. A plinth (wood, marble) which should be absolutely flat and level is placed on these, with a styropor layer on top and the aquarium can placed on this shelf. This is a fairly technical solution, and certainly will not be obtainable "off the shelf".2.3 Equipment Placement
Needs to be unobtrusive but accessible. By using a sump, your skimmer and filtration can be
placed in the cupboard, the heater can be away from slow moving
animals .
Those lucky people with a small room, or garage space behind the
aquarium may consider plumbing through the wall. A full- height cellar
below may also be ok. All the equipment can then be separated from the
viewing area,
2.4 General placement and viewing
Maybe your aquarium will have its own room, or niche, which can be
decorated and furnished to suit. Perhaps it is set up in the next room
with a wall cutout for the front glass to protrude into the viewing
room. If not, is it going to be squashed in
between cupboards, wall units and dressers?
Just like a good painting, a decorative aquarium needs space of its
own, and you might not want it on the wall next to the TV, if only
because it is going to be a light source. You are going to want to sit
and watch what is going on- can you see it from your sofa, or
comfortable chair? If you can avoid it being where you walk directly
past the front glass then it will allow the inhabitants more peace.